

A (pain)less journey into Arch Linux
A complete shift to Arch Linux.


Table of contents
- Pre-requisites
- Pre-installation
- Installation
- Post Installation
- Setting up a desktop environment
- Customization hell
- Changing the terminal
- Switching and customizing the shell
- Getting my everyday applications
- Getting Bluetooth
- Customizing the KDE desktop environment
- Changing the desktop manager
- Changing the screenshot utility
- Changing fonts
- Getting emojis to render correctly
- Getting screen share to work
- The nightmare of the tiling window manager
- A failed attempt at customizing GRUB
- Final Thoughts on Arch
For the past 6 months, I've been using Ubuntu 22.04 LTS as my daily driver and I have had a much smoother experience compared to using Windows 11. However, I did have more than a few problems with it as well. The most important one being, that I had no idea what is going on behind the scenes. Since I didn't understand how it worked, I didn't know a lot about what I can customize, and what I cannot. I also didn't particularly like the Gnome desktop, and I was getting more than just a few graphical bugs.
About a month ago, I decided to switch to Arch Linux, and it's probably been the best decision I've made. In this article, I am going to attempt to share my complete experience with Arch, how I got started, and all the tons of troubleshooting steps that I ended up doing to get up and running. Yes, there was a lot of troubleshooting, but along with that it was a lot of fun and I learned a lot as well.
"Sid said as his eyes have had dark circles ever since he started using Linux. His skin, aged enough to look 40 years old and his backbones, all misaligned"
By the end of this article, you will have the following takeaways
How to manually install Arch and realize that it's not as difficult as folks make it sound
Dual booting it with Windows
Display Servers such as X11 and Wayland
Customizing your desktop environment
What is a RICE, and how to make your own custom RICE
A lot of hours and failed attempts later, get your own Arch Linux environment
Pre-requisites
Before we get started with getting your Arch setup, let's make sure that you have all the prerequisites.
Basic experience with a Linux distro
A 4GB or bigger thumb drive
An OS currently installed on your PC
A sufficiently large internal storage device
Not being afraid of messing with disk partitions and the BIOS
Now, assuming you have all these prerequisites ready, we can get started with getting arch installed, customized, and ready to be a daily driver.
Pre-installation
Getting your boot media ready
As will the installation of any kind of OS, we will require a live boot environment, which contains all our installation files. This is a little different in the case of Arch Linux. In the bootable media we will be creating, we are not going to be having the actual installation files for Arch. Instead, we will have a couple of tools that we will be using to install Arch.
The essential files will all be downloaded from the internet, so make sure you have a stable internet connection (preferably a wired connection) before you attempt to install arch. The worst thing would be you messing with your partitions, formatting everything, and now you don't have an operating system at all.
Alright, now with the scary warning out of the way, let's see how to create a boot media.
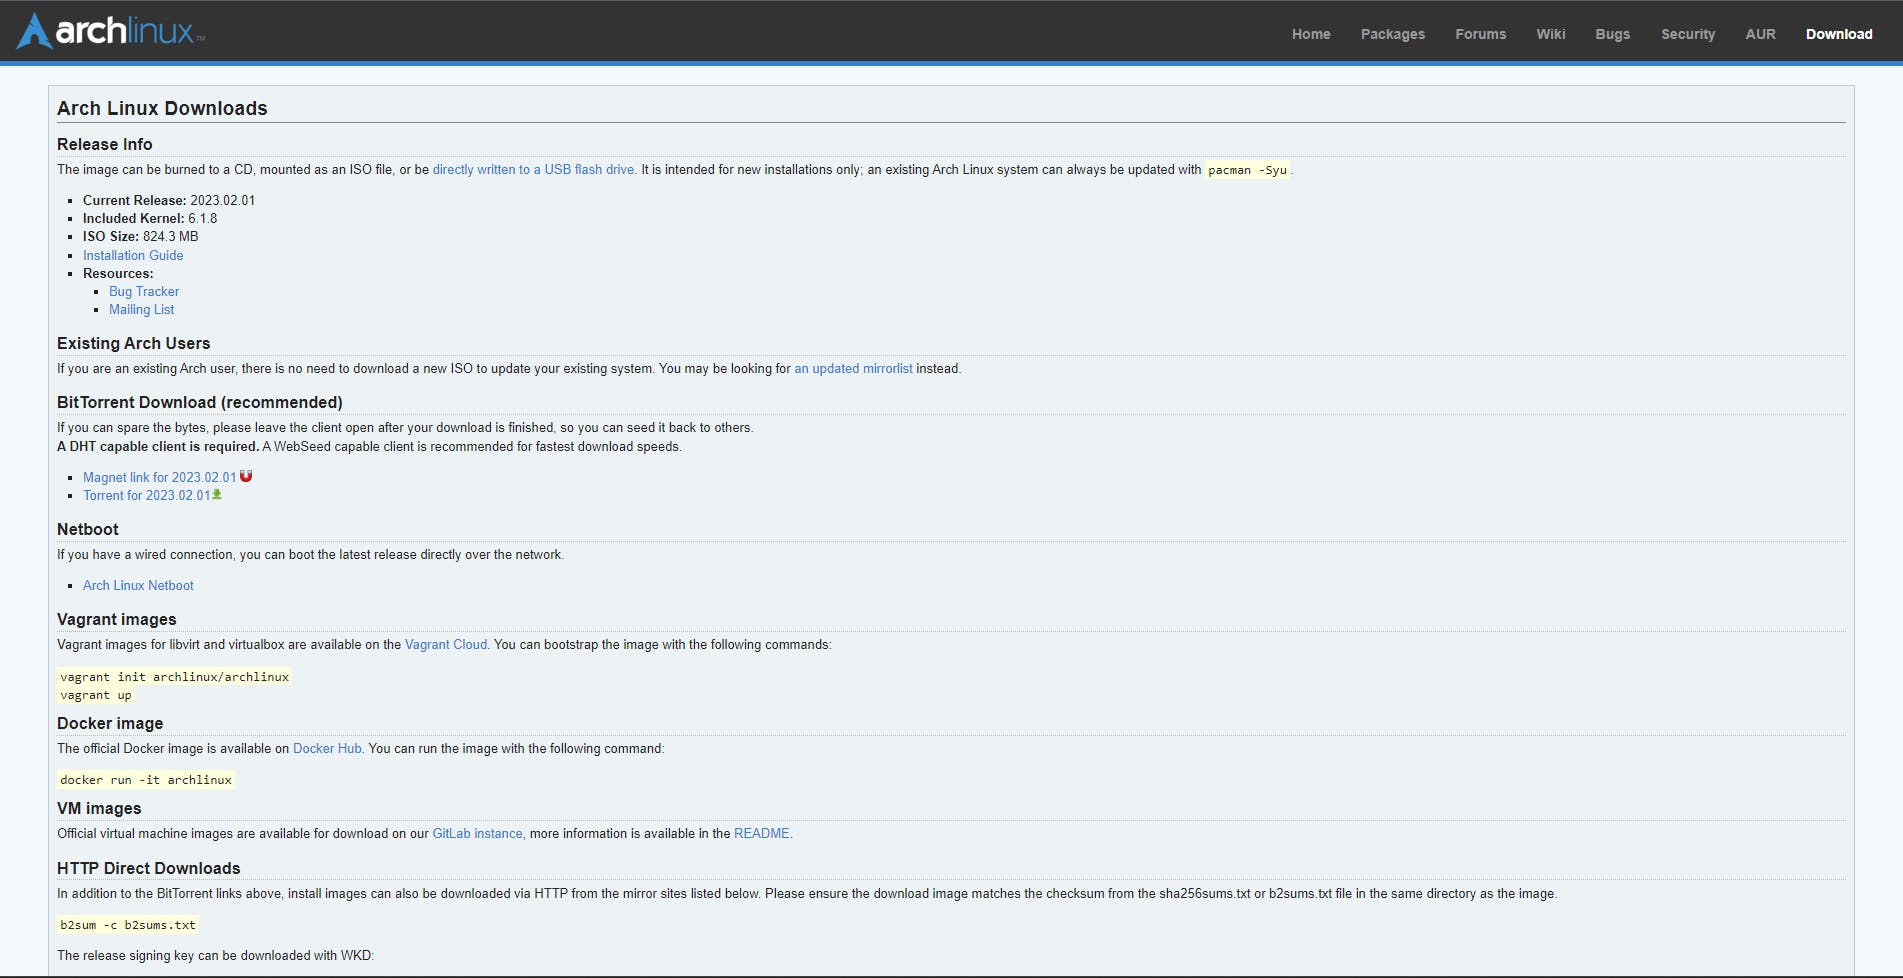
The first thing you want to do is head over to the Arch Linux download page and download the iso file. It's a torrent file, so make sure you have a utility such as uTorrent or BitTorrent to download it. It's nearly a 1GB file, so it might take a while depending on your internet connection.
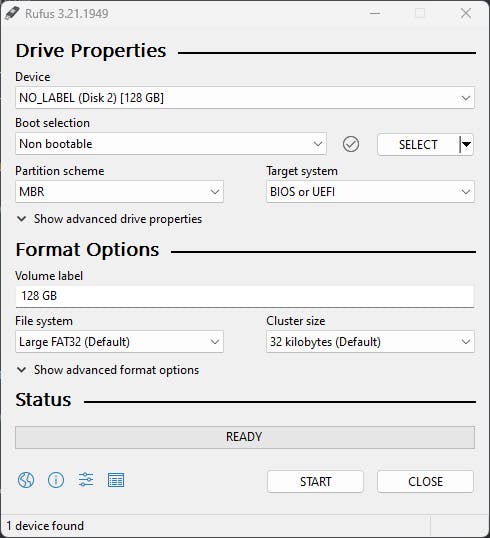
While the iso downloads, let's get our utility for creating a boot media-ready. If you're on windows, you can download and use Rufus. There are other tools as well, but I prefer using Rufus since I've used it a lot in the past. If you're currently on a Linux system, you can use Etcher. The process with both tools is pretty much the same, but we will be using Rufus.
Now plug in your USB drive, and open Rufus. You should see it as an option in the drop-down menu. In my case, it has the name NO_LABEL since I previously made it into a bootable drive. This would have a different name for you.
Under the Boot selection, select Disk image, then press theSELECT the button on the right, and select the Arch Linux ISO file you just downloaded. After that, make sure that your settings match the below image. The TLDR; version is that you want your partition scheme to be GPT, and the target system to be UEFI. Also, make sure that the filesystem is FAT32 or you might not be able to boot it.
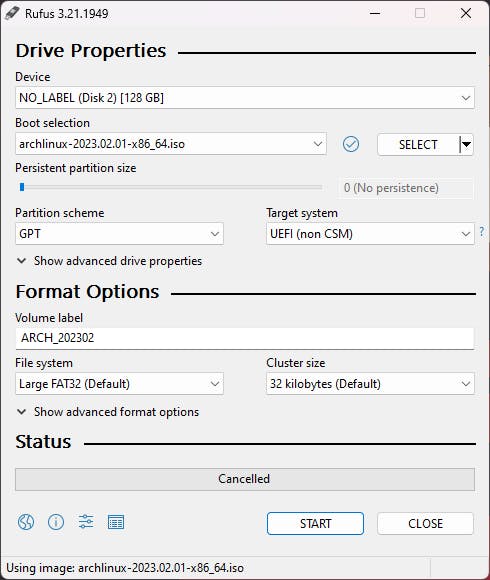
Now simply click start, and make sure you select DD image mode. I'm not sure why, but if you select the ISO image mode, it might not be detected in the BIOS, or it gives you an error when you boot from it.
And now we're done! We are ready to use our bootable USB drive and start the installation process for Arch Linux. But wait. I did say I would show you how to dual boot with Windows. If you do not want to dual boot, you can skip the next section
Dual boot preparation
Create partitions
Now, this preparation phase for Dual booting is all about creating partitions. If you are familiar with an OS installation process, you might raise the question,
"It's possible to create partitions in the live environment? Why can't I just do it from there?"
And to that I say, you are absolutely correct. However, if you are someone who intends to persist the data on your Windows partitions, then it is a wiser option to do it in your Windows environment. If you try doing it in the live environment, there is a pretty good chance that you will cause some kind of data corruption, which also means that you will be saying goodbye to all your Windows data including any sensitive or non-recoverable documents.
If you still want to try and create the partitions in the live environment, please note that you have been warned of the risk.
Now, using Windows, let's create our partitions. Open the search on your taskbar and search and open Create and format hard disk partions.
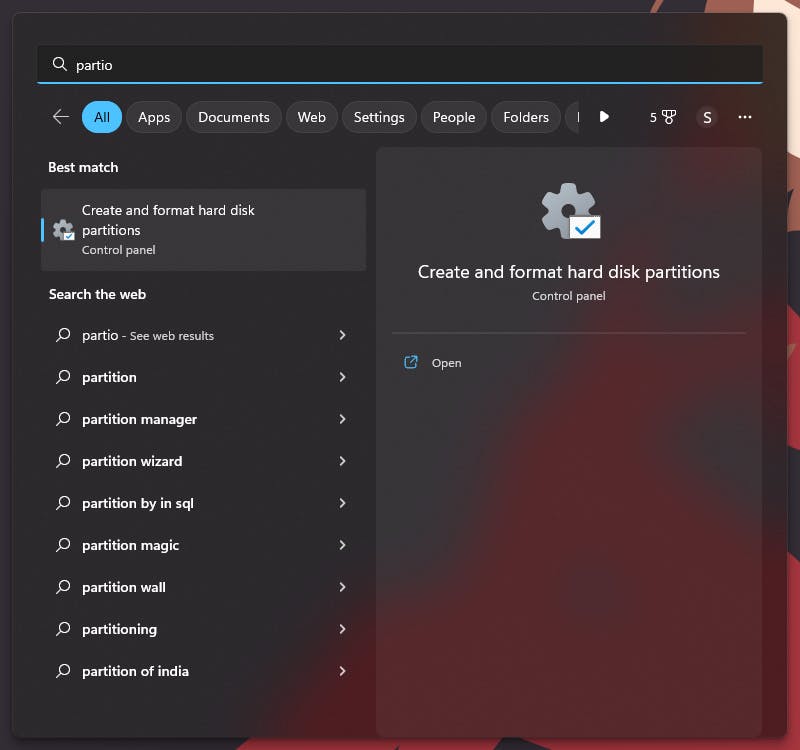
From here, we can manipulate all of our disk partitions. At this point, I would also recommend disconnecting your USB drive, as the partitions existing in the USB would also appear here, and we ABSOLUTELY DO NOT want to mess with them. If you did mess with them, then it's a pretty easy fix. Just repeat the step of making it into a bootable media.
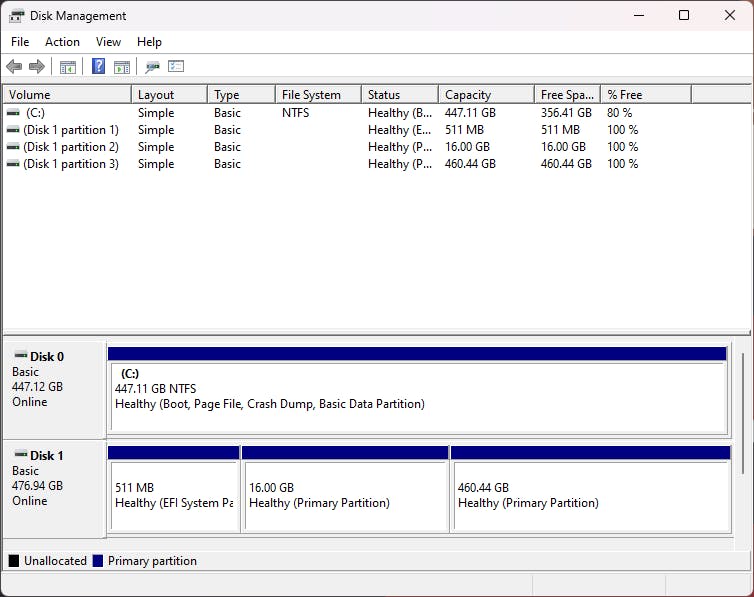
In my case, you can see that I have 2 SSD drives. I use one drive (Disk 0) for my Windows system and another drive (Disk 1) for my Arch Linux environment. Assuming that you have a laptop, and you have never ripped it open to add or replace hardware, you will have only one single drive with 2 or 3 partitions.
In case of a default Windows installation, you would have 3 partitions on your drive. An EFI system, a Windows Recovery partition, and an NTFS partition which is the main place where you store all your data.
DO NOT, under any circumstances, delete your EFI system. The EFI system contains your bootloader, which means if it's deleted, you're never getting back into windows without a fresh install.
As far as I know, the Windows Recovery partition doesn't house any system essential files, so it is safe to format it completely. But that also means if you mess up something in windows, and want to perform a recovery, you will need a windows boot drive.
Alright, so now, let's go ahead with the assumption that you have only a single SSD drive. We want to shrink your windows partition and make an empty partition inside which we will install Arch Linux. Please note, that we will need to create more partitions out of this drive as well. This is why I usually recommend having a second drive you can play around with. And even if you completely erase the second drive, you will still have a backup OS.
Right-click on your NTFS partition, and click on shrink volume. You will get this little menu here
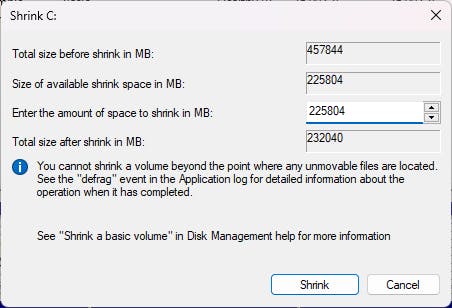
Right now, it shows all the available space which I can shrink, which is around 225GB. Now you obviously do not want to shrink the entire amount. Because then you will not have any free space in Windows for your new files or updates. I'd recommend making a new partition of around 100GB (100,000 MB) or 150GB (150,000 MB). The size totally depends on you, and your use cases.
After selecting your desired size, just click shrink and let the magic happen. You will get something like this.

Now we are done with our partitions. Before we can get started with installing, there is one more step to do to ensure we can successfully dual boot.
Disable Fast start-up
Windows has an option called Fast start-up. What it does is it essentially hibernates your PC instead of completely shutting it down. This will cause a problem when we try to configure GRUB (more on this later).
In order to disable it, follow the exact steps.
Open control panel
Click on
System and SecurityGo to
Power OptionsSelect
Change what the power buttons doOn the top of this page, there will be a button saying
Change settings that are currently unavailable. Click it.Disable
Turn on fast start-upand save changes.
I said to follow these exact steps, because right now, Windows has two settings menus. It has the new settings menu which looks modernized, and the old one which is what you would see back in the day of Windows XP. You will find the fast start-up settings only in the old settings menu which can be accessed through the control panel.
With this, we are officially ready to begin our Arch Linux installation.
Installation
This next step can be a little daunting for beginners, but I will try to go over every step in as many details as I can, and I will also mention places where you can possibly shoot yourself in the foot.
As I cannot take screenshots in the installation shell, I will perform them in my terminal, and you can follow along. Don't worry the process will be the same.
One more thing to note, please do not use a keyboard that uses your device's Bluetooth. Either use a wireless keyboard that has a USB dongle, or use a wired keyboard. Also note, that the mouse will be completely unusable until we get a desktop environment up and running.
Booting using Bootable Media
Now, to actually begin installing Arch, we first need to boot into the bootable media we created. Plug in your USB stick, and reboot your PC. This time, while it's starting up, rapidly press F2 on your keyboard to get into the BIOS. Depending on your motherboard/laptop vendor, the keybinding for entering the BIOS might be different. You can google and find out what is your keybinding. It is usually one of the following: F2, F6, F11, F12 or Del.
If you want to learn more about a BIOS, check out this video.
Depending on your motherboard, your BIOS can look very different from mine, or anyone else's PC. What you want to do first, is disable secure boot, and enable boot from pen drive settings. Ideally, both of these settings would be under theBoot tab, but if it is not, you will have to hunt for them in your BIOS. Once you've done this, press F10 to save and exit. This will reboot your PC. Please note the keybindings could be different for your PC.
After your PC reboots go back into the BIOS, and from the boot tab, put your Pen Drive as the first item in the boot menu. In my case the keys to change the boot order are F5 and F6, but again, it can be different for your PC. Once the pen drives in on top position, go ahead and save and exit the BIOS. Now let your PC boot normally.
Now the only difference between your regular boot, and this one, is that regularly, you would be using the Windows bootloader to boot into Windows. Right now, you are booting into your pen drive. You might see a menu with a couple of options, select the first option which will say Arch Linux Live install media or something similar.
Congratulations! You've made it into the actual installation process for Arch! Now starts the hard part.
P.S. it's only hard if you don't know what you're doing.
Now there are a couple of optional steps, and mandatory steps for installing Arch Linux. They are as follows
Set up your keyboard layout (optional)
Set your date and time (optional)
Connecting to the Internet
Create Partitions
Mount Partitions
Select download mirror
Installation using pacstrap
Post-installation
Some of these things might sound a little intimidating. but don't worry. By the end of this article, you will be able to easily install Arch within 30 minutes even without an install script.
Setting up the Keyboard Layout
Unlike a Windows or Ubuntu installation, the Arch installation process is not going to give you a GUI. This means that your mouse is practically useless at this point and the only friend you can rely on is your keyboard. This shell that you are using is called the TTY.
Keyboards come in a ton of different layouts. Many are similar with just one small little difference, but that difference can cause a lot of problems if you're not used to it. If you are using a standard QWERTY layout keyboard, you can most likely skip this step.
We already have a couple of layouts that we can use in our live environment. To see the list of all of these layouts, we can list all the files present in the /usr/share/kbd/keymaps directory. You can use the following command to get a list of all the available layouts. Every layout which we can use will be a .map.gz file.
ls /usr/share/kbd/keymaps/**/*.map.gz
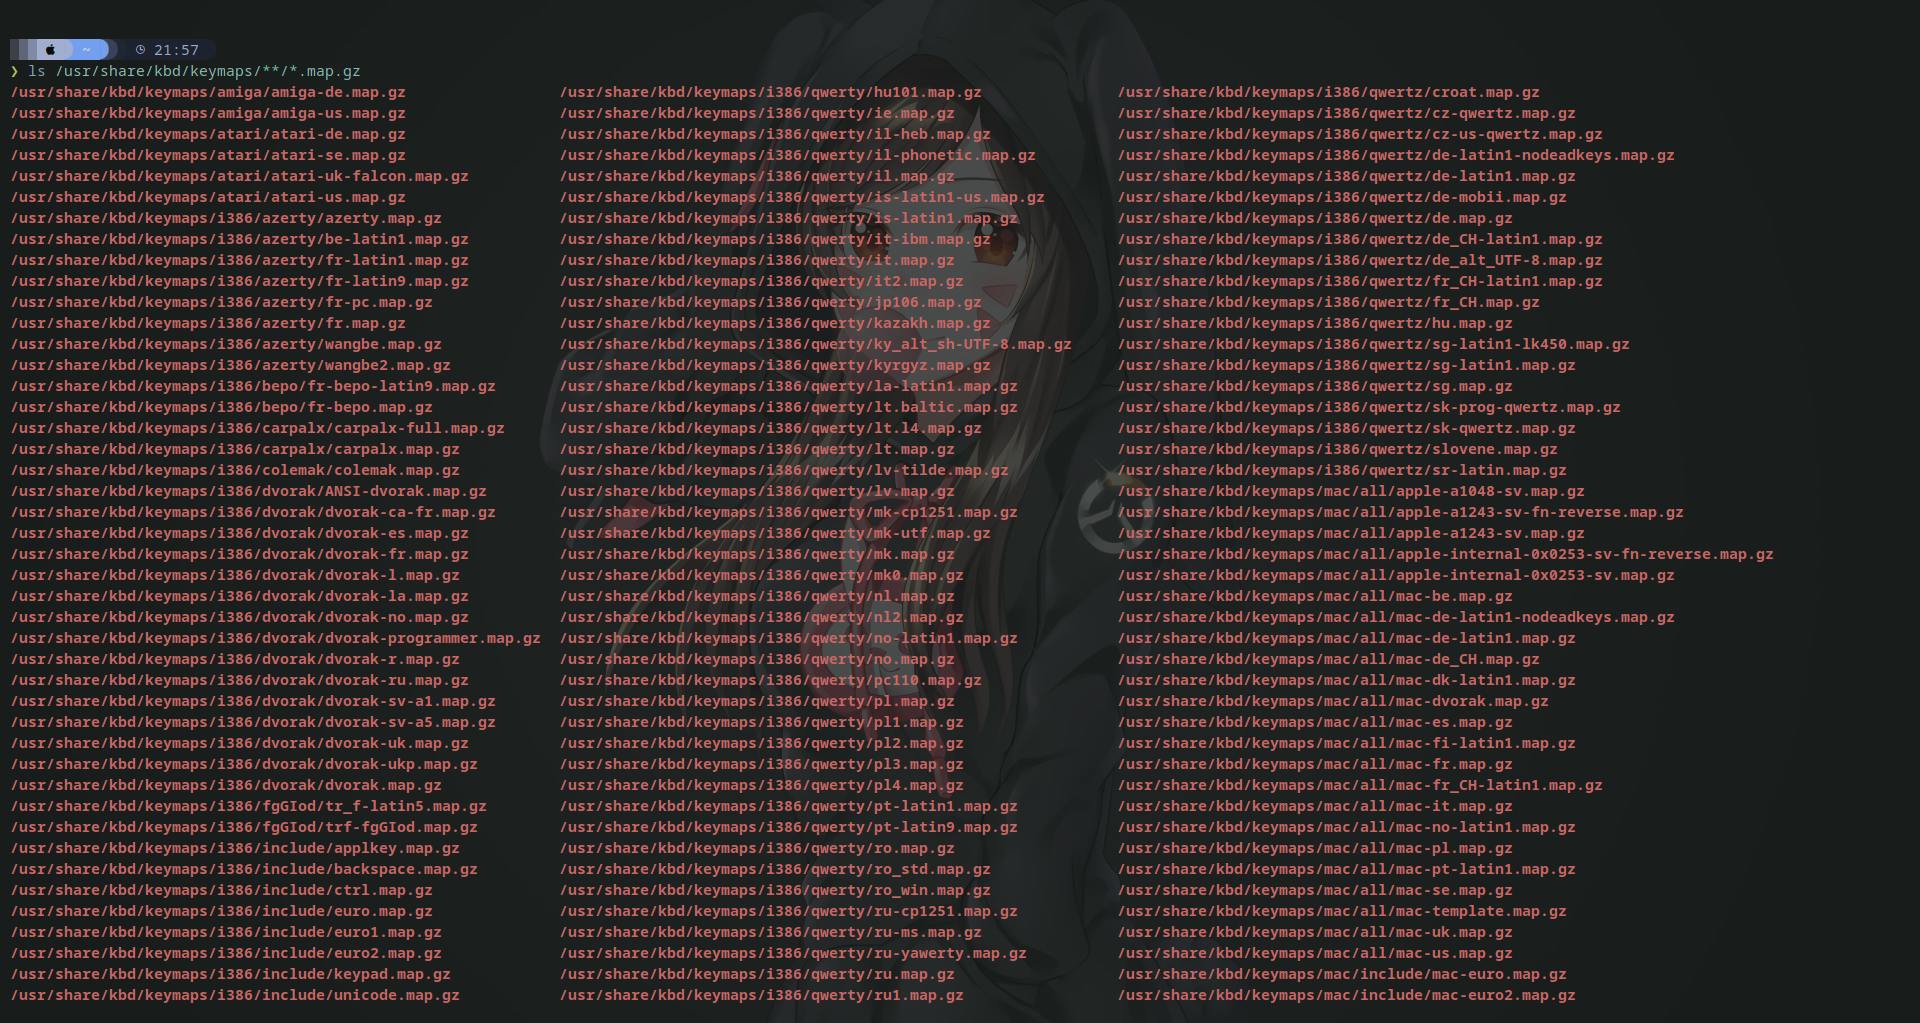
Now, this is a very long list, so assuming you know the exact layout you want, you can use a grep to find the exact file name. Now that you have the filename, let's go ahead and tell our shell to use the new layout you want. You can use loadkeys [layout-name] to set your new layout. For example, if we wanted to use the sunt-6-uk.map.gz layout, then we can run the following command.
loadkeys sunt-6-uk
Update the system clock
This next step is optional and it does not matter if you skip it. But for the sake of covering everything, let's talk about it.
We want to update our system clock, and have it use a local timezone. By default, your system clock will be set to a UTC timezone, which may or may not be your local timezone as well. In order to check what is the current timezone, we can run
timedatectl
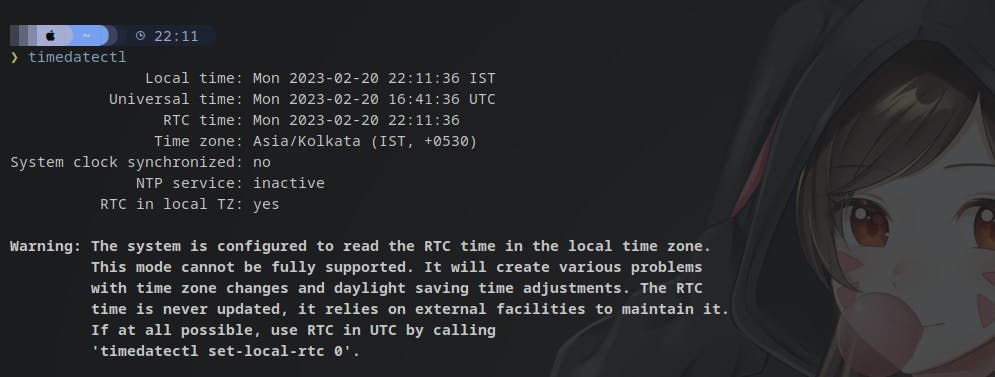
You can see that in my case, it's set to the correct time zone. But that is because I have already installed and configured everything. For you, it will most likely show all the values in UTC time. Let's change it to your local time zone.
In order to view all the available timezones, you can use
ls /usr/share/zoneinfo/
As you are using zsh shell, you can press Tab to autocomplete and see all the available options. Using this, navigate and find your local timezone region. Or alternatively, you could use datetimectl list-timezones to get a list of all the time zones.
In order to change the timezone, we can use timedatectl set-timezone [Timezone name]. My timezone is Asia/Kolkata, so if I wanted to apply that, I would run
timedatectl set-timezone Asia/Kolkata
Connecting to the Internet
At the beginning of this blog, I mentioned that it is very important to have a stable internet connection for installing Arch. One of the reasons for this, is we DO NOT have the installation files in our boot media. We only have a certain suite of tools that will help us to install and configure arch.
Ideally, it would be good if you have a wired connection. In order to check if you are connected to the internet or not, you can run a simple ping command such as
ping google.com
If you get a response from the server, it means you're good to go. However, if you do not have access to a wired connection, you will need to find and connect to your wifi device. This process can be a little tricky.
According to the official Arch installation docs, you should use iwd to connect to your wireless network. However, in my case, iwd has never really worked for me. I would recommend taking a look at the iwd docs page to configure your wireless adaptor. The steps are mentioned in a pretty straightforward way.
However, if you are unable to connect to a wireless network using iwd, there are a couple of alternative tools mentioned as well. You could try those.
Create partitions
Now, once our internet is set up properly, we need to create partitions for installing Linux. I would go as far as saying that this is the most sensitive and dangerous step in the entire installation process. One wrong move and you have lost all your data, assuming that you are dual booting. If Arch is going to be your only OS, then you're safe.
Alright, now to actually start partitioning stuff, we need to know what are we dealing with. Use the fdisk command to list all our drives and their partitions.
fdisk -l
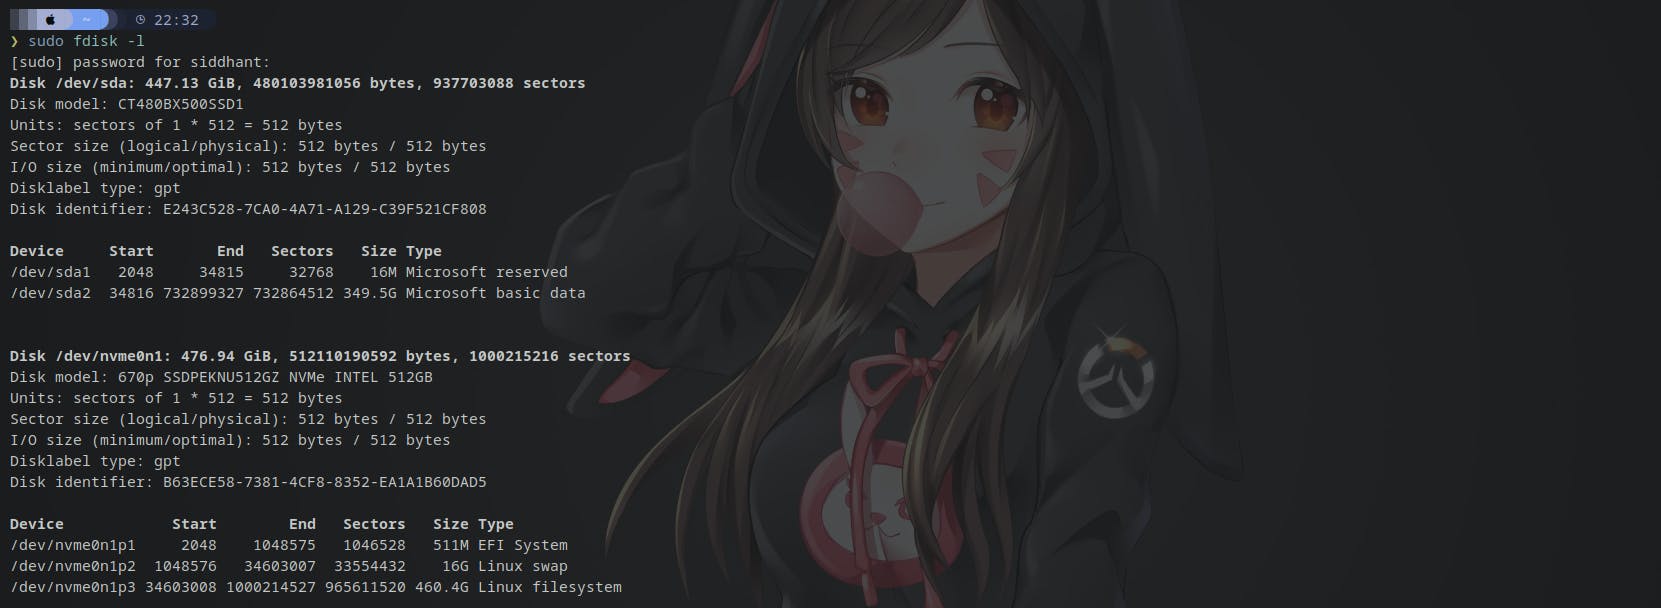
Here, I have got 2 drives. One is my Sata SSD(/dev/sda), and the other is a Nvme SSD(/dev/nvme0n1). The SATA SSD contains all of my Windows data, so we will not be touching that. This is one of the reasons I recommend having a separate drive for Linux. It becomes difficult to accidentally format the wrong disk.
Now let's take a look at the partitions I have in my /dev/nvme0n1 drive. I have an EFI system, a Swap memory, and my Linux Filesystem. Let's see what each of these filesystems is necessary for.
EFI system:- This type of partition contains all of your bootloaders. Currently, only your Windows bootloader exists here. We will soon add the Linux bootloader as well
Swap: Swap memory basically uses some of your SSD storage as virtual RAM. This is especially useful if you have very less physical ram. Check out this article to learn more about SWAP memory
Linux Filesystem: This is where we will install Linux. This is where all of our files and users are going to exist.
Some folks prefer making 2 more partitions, one for the root user, and one for your default user. That isn't really necessary, but it's a good way to separate your root from other users. That is useful if you are planning to have multiple users on this system.
You are probably going to have only one or two partitions in your drive. One will be your EFI partition, and the other will be some free space. We want to create our Linux swap and the Linux filesystem partitions. For this, we can use cfdisk [diskName]. In this case, I want to create partitions on my disk labeled as /dev/nvme0n1. Hence, I will use
cfdisk /dev/nvme0n1
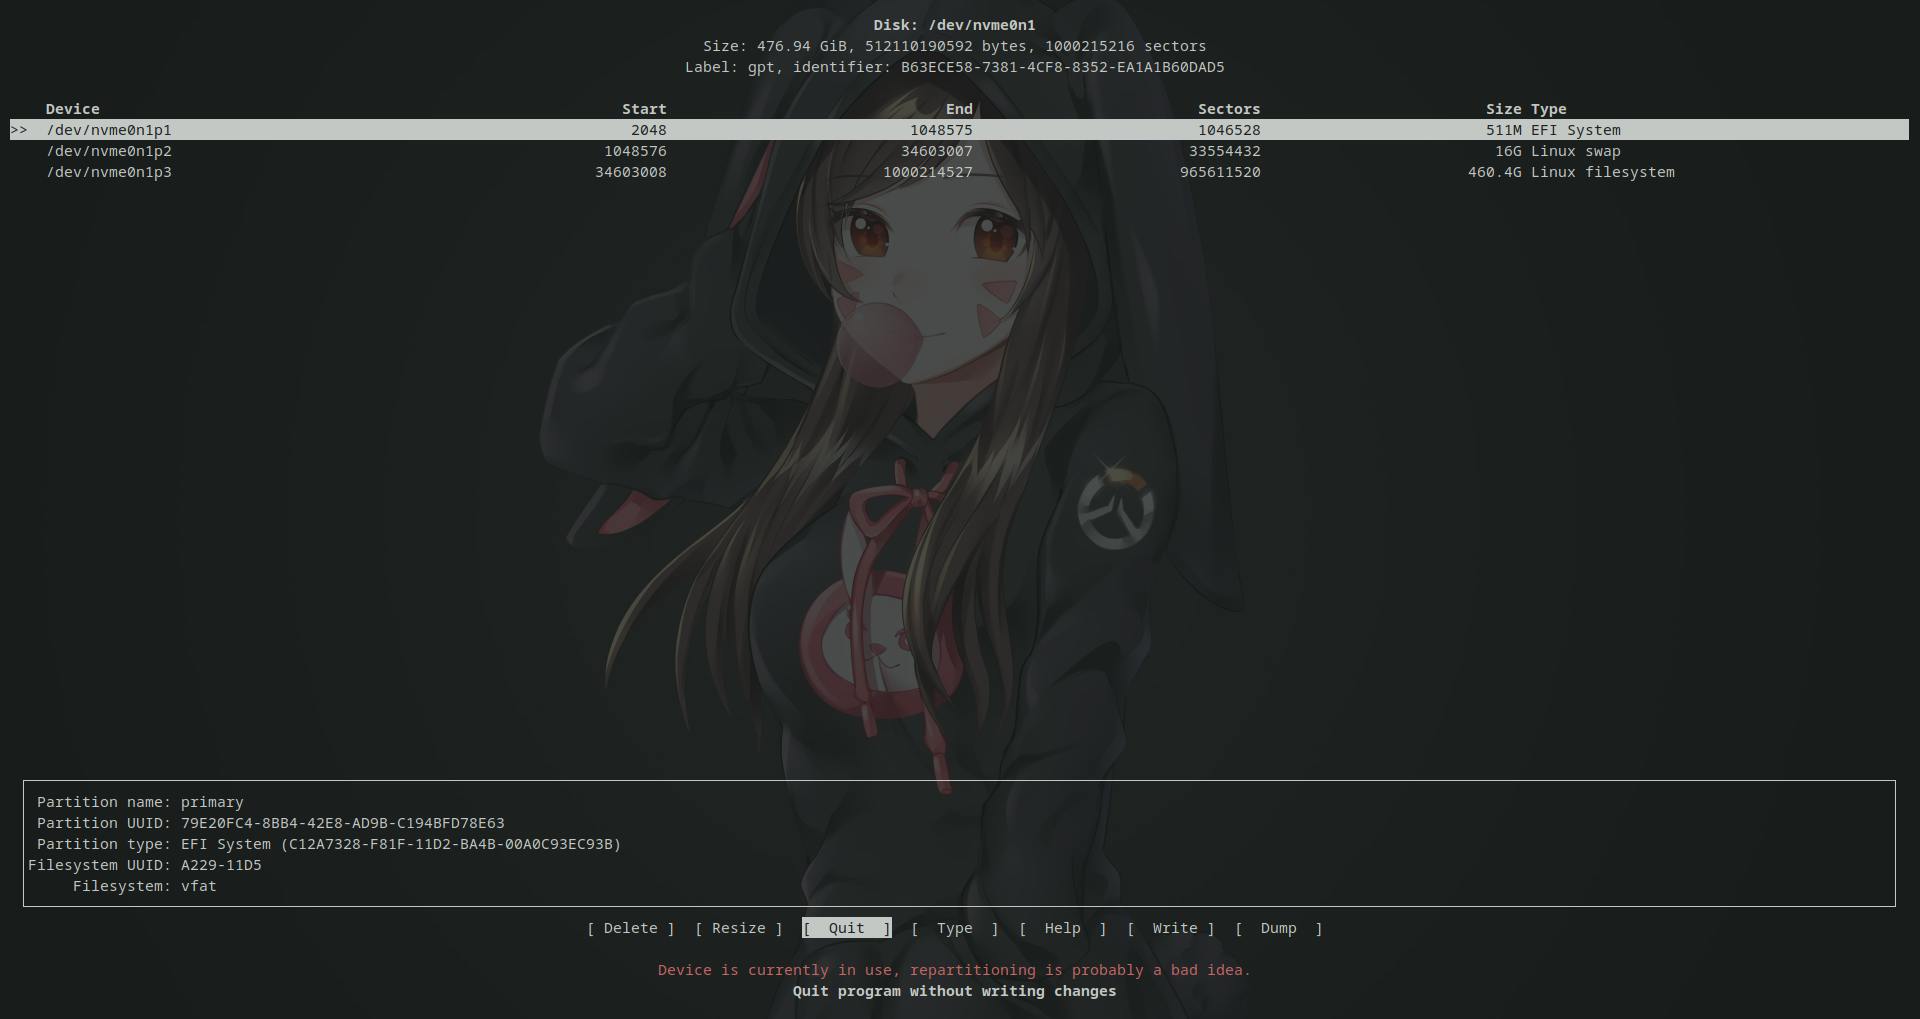
cfdisk will to give us a pretty intuitive experience to partition our disks. Go ahead and create a Linux Swap partition and a Linux filesystem partition.
From what I've read online, your swap size should be at most, twice the size of your Physical ram.
Once you're done making the partitions, Write the changes and Quit cfdisk. Now you can once again use fdisk -l to make sure your partitions have been created.
Protip: If you have multiple drives, you can use
fdisk -l /dev/[driveName]to list the partitions that exist only under the specified drive
Formatting the partitions
So far, we have only created the partitions we require. Now it's time to format them into the exact Filesystem we need.
⚠️ If you are dual booting, DO NOT touch the EFI file system. I repeat, DO NOT touch the EFI filesystem. If you format it, you are going to lose your Windows or any other bootloader which means you can no longer access that OS! ⚠️
In order to format our partitions, we are going to use the mk command.
Now, if you don't have another operating system, and you just created an EFI partition, you will want to format it into a FAT32. If you already had the EFI, and you did not create it, then it is already a FAT32 filesystem. We can do this using
mkfs.fat -F32 /dev/nvme0n1p1
Please note, I am typing /dev/nvme0n1p1 because that is my EFI partition. Please replace that with whatever is the name of your EFI partition.
Next, we will format our swap partition. We can use mkswap for this. So the command will be
mkswap /dev/nvme0n1p2
Finally, we want to format the Linux filesystem into a .ext4 format. For that, we can use mkfs.ext4
mkfs.ext4 /dev/nvme0n1p3
Mounting the new Filesystems
We have gotten through the most difficult part of the process. You can go ahead and pat yourself on the back now.
Let's go ahead and mount our newly created drives. We only need to mount the swap and the Linux filesystem. The EFI does not need to be mounted. First, let's mount the Linux filesystem, then enable the swap memory.
if you do a ls /, you will see that we have a /mnt directory. Right now, we are still using the bootable media. We will put our Linux filesystem in the /mnt directory and use it. Let's mount /dev/nvme0n1p3 to /mnt.
# mount [device] [mount to]
mount /dev/nvme0n1p3 /mnt
Next, let's tell our system which partition to use as a SWAP memory. For this, we will use swapon.
swapon /dev/nvme0n1p2
Configure mirrors
Alright, now at this point, we have our partitions ready. And it also means that we have finished all the risky and dangerous parts of the process. Now, I mentioned in the beginning, that the Arch bootable media has absolutely no installation files. Just a bunch of tools that will help us install. So in order to begin the installation we first need to configure the mirrors from where we will download our packages from.
I would consider this step optional, but if you want a good download speed, then it's recommended to do this. Otherwise, you can get a download speed as low as 1 byte/second
Before we go ahead and configure the mirror, let's understand what is a mirror and why it actually matters. Let's say you wanted to download a file, but the server in which the file exists is located on the other side of the world. Now you can obviously download it, but it will take a lot of time since a lot of bandwidth would go into routing.
In order to download the same file with a greater download speed, you would want to download it from a server that is located closer to you, hence less routing. This is what is known as a download mirror. The same file will exist on servers in a different physical locations. Now you understand why skipping this step can give you a slow download speed.
We will be using a tool called reflector for configuring our mirrors. But before we do that, let's see where are our current mirrors located.
Arch Linux uses a package manager called as pacman. We can find the mirrors that pacman is using in /etc/pacman.d/mirrolist. Let's go ahead and print this using cat
cat /etc/pacman.d/mirrorlist
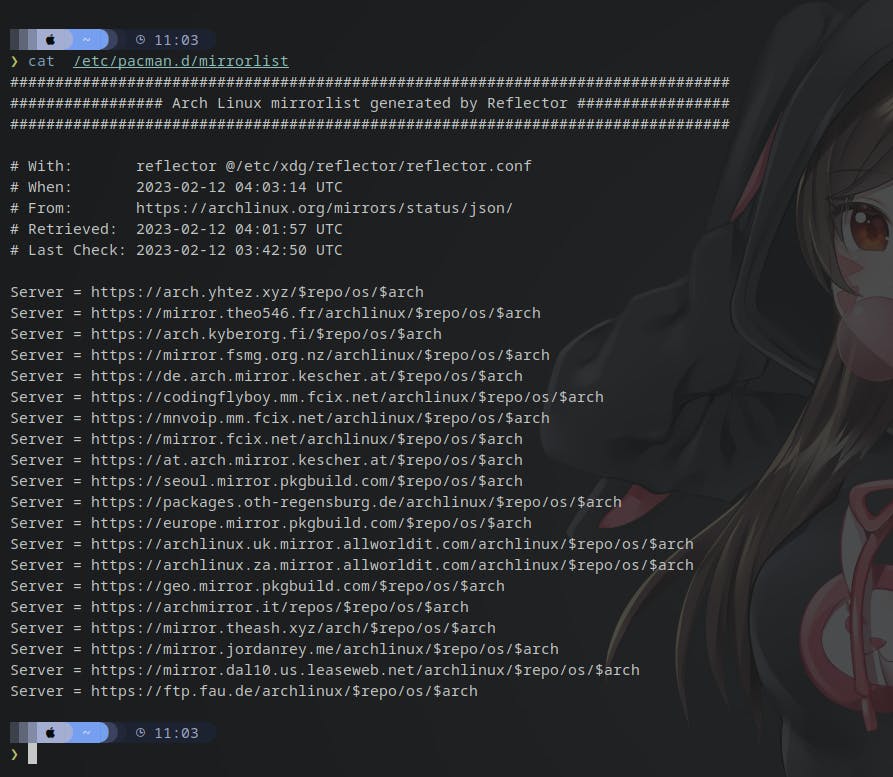
You will see a similar list in your mirrorlist file. The only difference here is that I have already used reflector to get the best mirrors for my location.
Now, you can run reflector to make sure that you can connect to the Arch mirror status and get a list of all the latest mirrors.
reflector
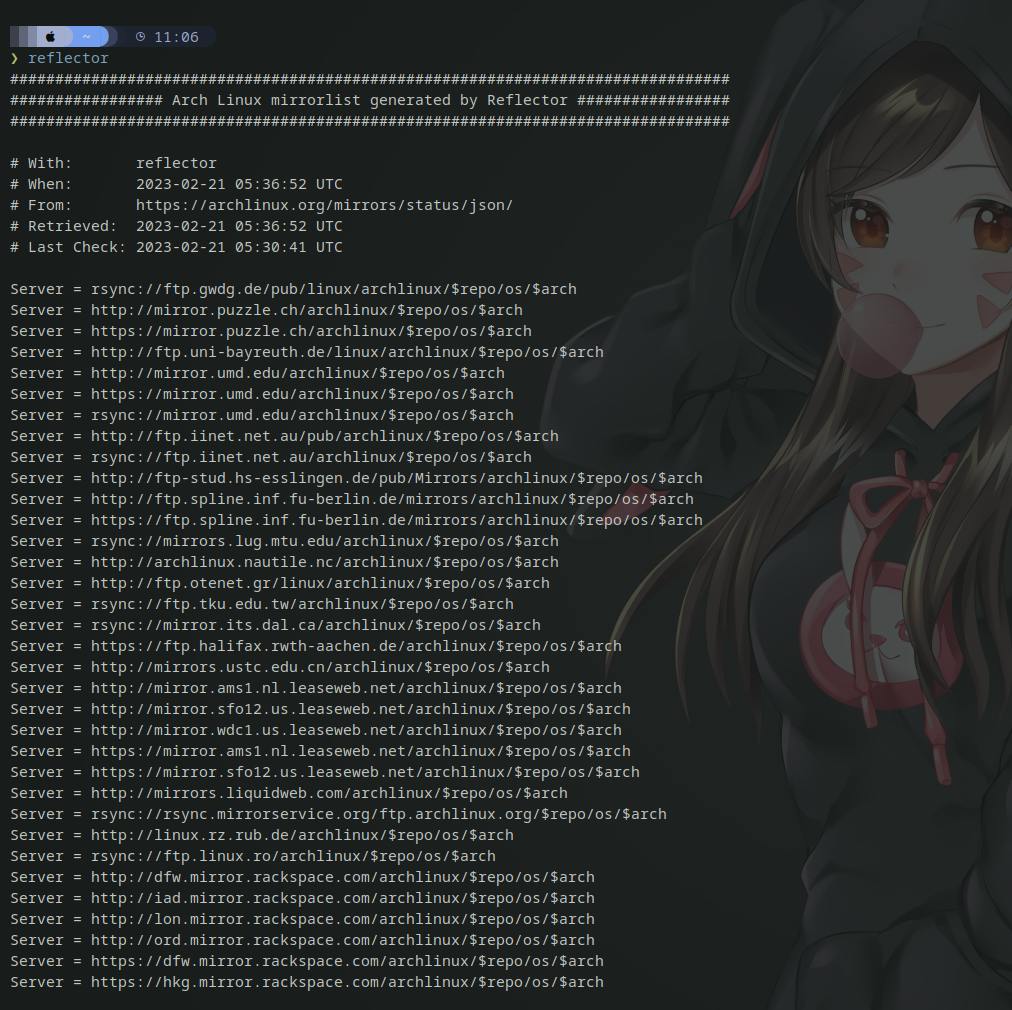
This will print a long list of mirrors that you can use. Now, just because it prints all these mirrors, does not mean that it's the best mirror for you, based on your location.
In order to get the best mirrors, we will use reflector, give it some flags to have it give as the mirrors of only a few locations, and sort them according to the speed. Then we will save this list in our mirrorlist file. As I live in India, I will be using India, Singapore, Indonesia, Japan as my mirror region. Hence, the command for me will be
reflector --country India,Singapore,Indonesia,Japan --protocol https --sort rate --save /etc/pacman.d/mirrorlist
Let's see what each of these flags is doing
reflector: The tool which we are using
--country: Select mirrors that exist in these locations. India,Singapore,Indonesia and Japan in this case
--protocol: Use this protocol to get the mirrors. https in this case
--sort: Sort the mirrors based on this. Here we are sorting them based of the download rate/speed
--save: Whatever you print, save it into this specific file. Our pacman mirrorlist in this case.
After this, you can once again cat your mirrorlist file and see the updated mirrors.
Install Arch
Now we are ready to install Arch. We've made our partitions, and set our mirrors. All that's left is installing the packages we need. First thing before we go ahead and install Arch, we want to sync and update the repositories. In order to do this we can use the following command:
pacman -Sy

We are using pacman as that is the package manager for arch. The flag -Sy is used to sync repositories with the latest versions. This is good to do so that when we install Arch, we get the latest version of it.
Now, in order to start using Arch Linux, we will be using pacstrap which is a utility that should be used ONLY when doing a fresh install. If you use it any other time, you can most possibly break your entire system. A good rule of thumb is to use pacstrap only and only during the Arch OS installation. If you want to install any other packages after that, use pacman.
We will run the following command, and after that, I will tell you what we are doing.
pacstrap /mnt base base-devel linux linux-firmware linux-headers vim sudo ntfs-3g
We already explored what pacstrap is. Let's talk about all the other items in this command.
/mnt: This is the directory where we want to install all the packages. Please make sure you have mounted your .ext4 partition before running pacstrap.base: The base Arch Linux package, which contains the OS.base-devel: Pacman repositories do not contain all the packages. Some are present in AUR which you will need to build manually. This package will install utilities that are useful for building those packages. Later we will look at an alternative way to install AUR packageslinux: This is the latest. most up-to-date Linux Kernel. There are 2 other kernels that we can use. Thelinux-ltswhich is the most up-to-date LTS kernel, and thelinux-hardened, which is a Kernal modified to be more secure.linux-headers: If you plan to work with kernel modules, you should install the kernel headers as well. This is optional and you can install this later as well.vim: Our handy text editor. You can replace this with nano as well, just make sure you install a shell-based text editor. We won't have GUI access for a while.sudo: Yes, sudo is a package and not a kernel functionality. Sudo will allow normal users to get root access. So you don't need to switch to root every time you want to install a new package.ntfs-3g: Ignore this package if Arch Linux is going to be your ONLY operating system. This package is useful for working with partitions that are formatted in NTFS a.k.a Windows partitions.
Out of all these packages, the only two needed, for the most barebones version of Arch Linux, are the base package, and the kernel i.e linux or one of the three other mentioned kernels. You can install multiple kernels as well, and you can use the bootloader to determine which kernel you want to use. More about the bootloader later.
This process will take a while and will download around 800 MB worth of packages and install them. You can download more packages in this step itself, but for the sake of knowing what we are doing, and what package does what, we will install those packages in t
⚠️ Do not, under any circumstances, interrupt this process. Something WILL go wrong, and you will have to start over again. If it is downloaded slowly, let it download, and go do something else. You can change the mirrors later. And if you are using a laptop, make sure it is plugged in. ⚠️
Post Installation
Congratulations! You have officially installed Arch Linux. But wait! That's not the end of it. We still need to install and configure a bootloader, create users, and passwords, configure our network, and so much more! Also if you restart your computer right now, you're not gonna be able to come back since we don't have a boot loader yet.
Let's get started with the post-installation process. This will include, creating a fstab, creating users, setting locale and timezone, wireless configuration, Bluetooth, graphics drivers, and finally installing a properly functioning desktop environment.
Generate fstab
The first thing to do is generate a fstab. What is a fstab you ask? A fstab will determine how all our partitions should be mounted into the file system. So right now, we only have a single partition mount in /mnt. Right now, we have mounted our Arch Linux filesystem that exists in the /mnt directory of our live boot drive. Once we exit out of the boot drive, and load Arch which is installed on our nvme drive, we need to specify how the partition should be mounted. For this, we will use the genfstab command and save it in the /etc/ directory.
genfstab -U /mnt >> /etc/fstab
The -U flag generates our fstab using the UUID of the partitions. In the above command, we are generating a fstab, and saving it to the /etc/fstab file. If this file does not exist, it will automatically be created.
Log into the newly installed OS
I mentioned this earlier, but right now, we are in our live boot drive and not in our freshly installed system. In order to continue configuring our system, let's first log into our newly installed arch system. We will be using a modified chroot command called as arch-chroot.
arch-chroot /mnt
What this does, is it lets us use some of the tools present in our live environment. Let's go ahead and change root into the mounted partition
Set a timezone
Remember back in the live environment we had a step where we configured the local time? I called that step unnecessary because we have to do it inside our installed Arch system anyway. However, here we will not be using timedatectl. Instead, we are going to be creating a Symbolic Link. Symbolic Links are pretty similar to the concept of pointers in C and C++.
First, let's list all the major timezones using:
ls /usr/share/zoneinfo

Using this, find your exact timezone. My timezone exists in the /usr/share/zoneinfo/Asia/Kolkata directory, hence I will use this. You will need to find the path to your particular timezone.
Once you have the time, we can go ahead and create a symbolic link using:
ln -sf /usr/share/zoneinfo/Asia/Kolkata /etc/localtime
This will create a symlink between the Asia/Kolkata timezone file, and the /etc/localtime file.
Set your locale
The next step is to configure the language of your system. In order to do this, we will be using the locale-gen command. However, before this command can work, we first need to do some configuration. The loacle-gen command will read the /etc/locale.gen file, and using this file, will generate the locale to be used. So let's open this file with a text editor of choice. I'm using vim but you can just a well use nano or any other tool.
vim /etc/locale.gen
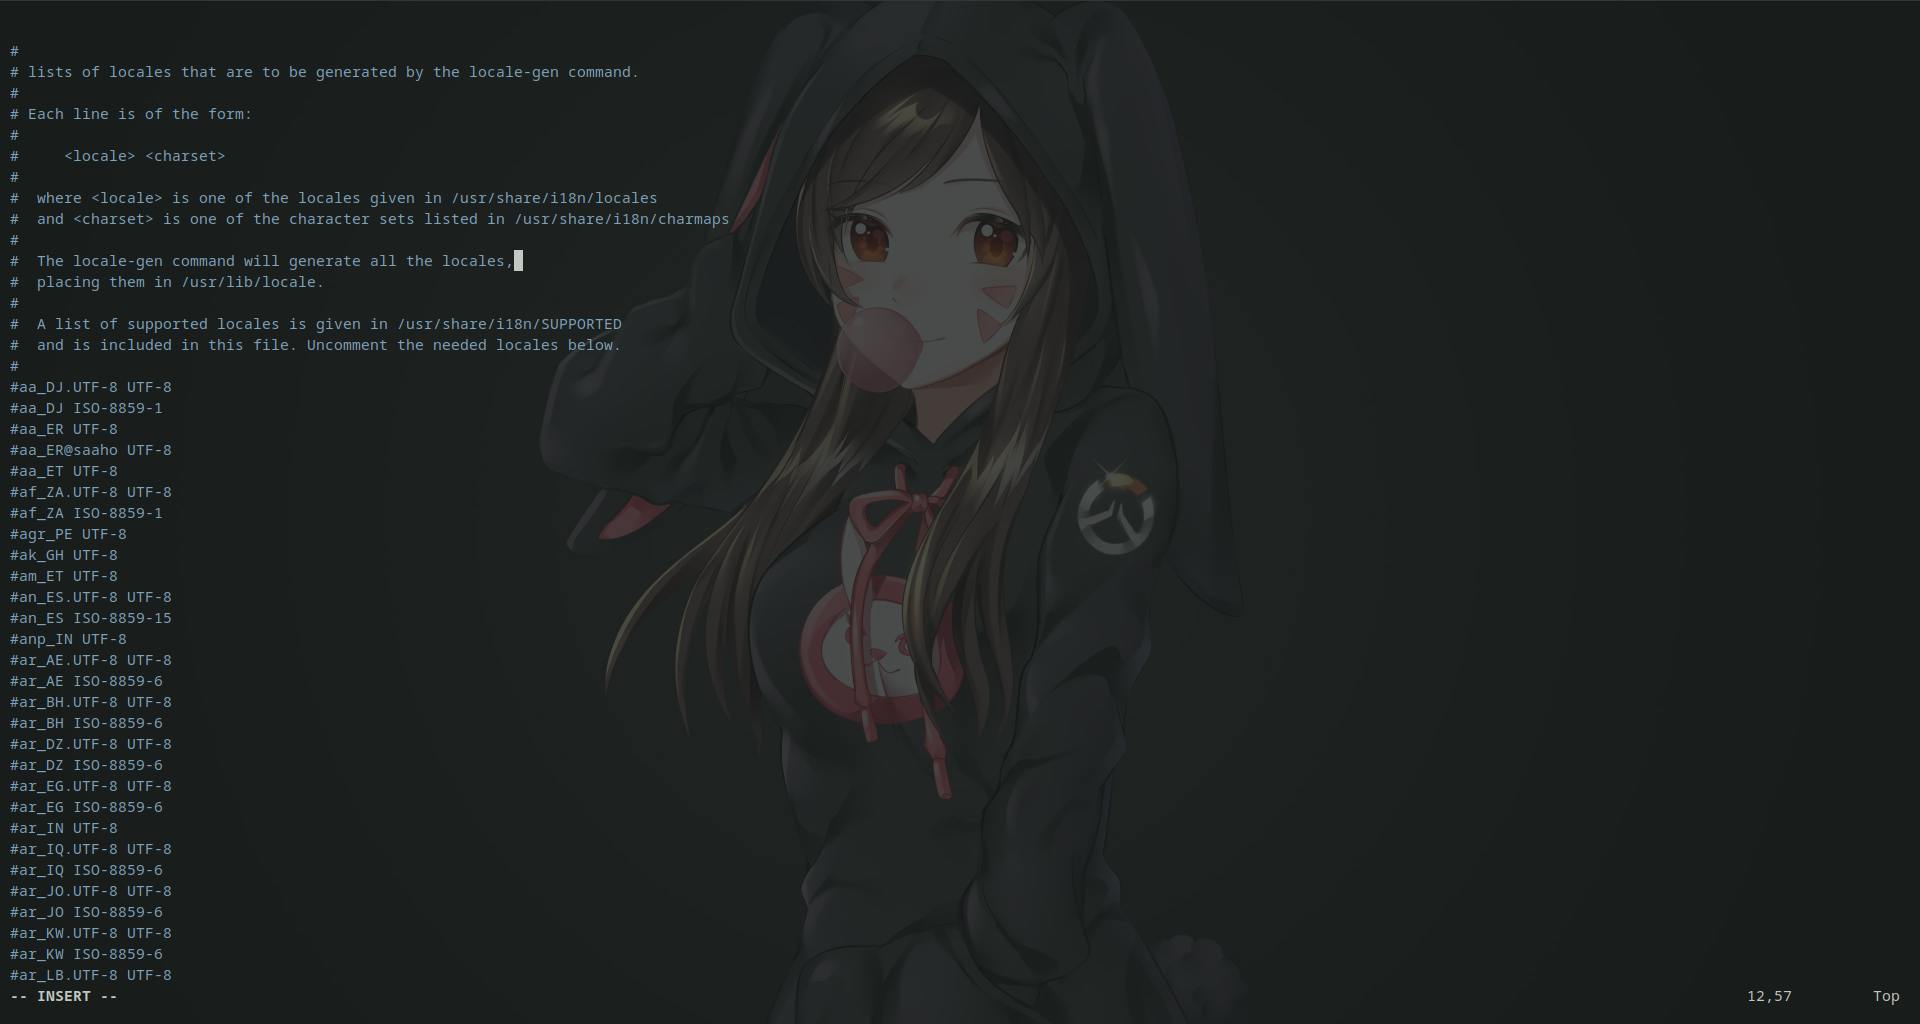
In this file, you will see a very long list of possible locales. You will need to find the locale you want and uncomment it by removing the #. I will be showing you how to do it using the en_US.UTF-8 UTF-8 locale.
If you are using vim, you can follow what I'm doing. It can be a little different in nano, so I recommend learning how to use nano first.
In such a big file, manually scrolling to find the locale we want can be a pain. Thankfully, vim has a pretty great search feature. We will first enter the normal mode by pressing Esc. Now we will type / and enter the regex we are looking for. So in normal mode, I will type /en_US, and it should highlight the exact file I'm looking for.

Once you find it, press Return to exit out of the finder mode. Now press i to enter insert mode, and you can uncomment this line. Press Esc once again, to enter normal mode, then type :wq to write/save our changes, and exit out of vim.
Now, we can go ahead and run locale-gen to generate our locale.
locale-gen

Since we are using the arch-chroot to access this filesystem, you generally should not get a Permission Deneied message, but if you do, just run the command with sudo.
Network Configuration
Now let's configure our network. First, we need to give our computer a hostname and define the hosts, and finally, we will install the networkmanager package which will manage our network.
First, let's give it a hostname. In order to do this, open the /etc/hostname file using a text editor and give your computer a name. My hostname is going to be siddhant, but you can name it whatever you want.

The next step is to configure the hosts. This means setting some IP addresses for the local host, and hostname. Go ahead and edit the /etc/hosts file. This file will be empty when you open it. It might not even exist. If it does not exist, create it using touch and then add the following lines.
127.0.0.1        localhost
::1              localhost
127.0.1.1        siddhant
Replace siddhant with whatever you set your hostname to in the previous step.
Now let's go ahead and install networkmanager. We can use the package manager pacman to install it. Just run the following command and you can install it.
pacman -S networkmanager
If it gives you an output like package not found you probably made a typo. If you're sure that you didn't make a typo, then update your mirrors, and run pacman -Sy.
Now that we've installed networkmanager, let's go ahead and enable it. We will use systemctl to do this. systemctl is a utility that allows us to manage systemd services and units. We can enable NetworkManager using
systemctl enable NetworkManager.service
Please be aware of the capitalizations. If you don't use this exact name, you might get an error saying networkmanager.service not found
Set a root password
Now, we need to set a password for our root user. You can skip this step but it's wise to have a root password. You don't want anyone to be able to mess around with your system settings. Currently, you are the root user, so we can simply use the following command to set a password
passwd
It will ask for your password twice, so go ahead and enter it.
Create a non-root user
I already mentioned why it's a bad idea to use your PC as a root user. So let's go ahead and create a non-root user. But we also want to make sure this new user can use sudo to get root permissions for specific commands. You will still need to enter the root password to get the root privileges.
Let's use the useradd command to create a new user named siddhant. I want to create a home directory for this user. For this, I will use the -m flag. I also want to make sure that this user can use sudo to get root privileges. For this, I will add them to the wheel group using the flag -G. The wheel group has administrative permissions in Linux.
useradd -m -G wheel siddhant
Now let's go ahead and give siddhant a nice and strong password. We will again use the passwd command, but this time, we will mention which user do we want to give a password to.
passwd siddhant
Now in order to make sure that we can actually use sudo, we need to edit the /etc/sudoers file. Find and uncomment the following like
# %wheel ALL=(ALL) ALL

This line will generally be towards the bottom of the file.
⚠️ Do not uncomment the line with NOPASSWD. This means that you do not need to enter the root password to get sudo permissions. And I've already mentioned why it's a bad idea to let anyone use sudo freely ⚠️
Install a microcode
Next, we need to install a microcode for our CPU. A microcode is the lowest level of instructions for your CPU. Check out this article if you want to learn more about what a microcode is.
AMD and Intel often release stability and security updates for their processors. Go ahead and install the microcode for your CPU.
#If you use a Intel CPU
pacman -S intel-ucode

#If you use a AMD CPU
pacman -S amd-ucode
Now to actually be able to use this microcode, we need to configure it in our bootloader. We will cover this in the next step.
Install and configure a bootloader
Now there's just one more step before you can say "I know how to install Arch Linux." We need to install a bootloader and set it up. This step is important to do before removing the bootable media. After this is done, we can remove the bootable media and then continue the next steps.
So first of all, what exactly is a bootloader and what does it do? If you've ever built a PC, and you start it for the first time, the thing that is going to open is your Bios. Why does it open the bios and nothing else? This is because there isn't a bootloader that can instruct the computer on which environment to boot into.
The simplest way to understand a bootloader is to think of it as a set of instructions, on how to boot your OS. For a desktop Linux environment, the most popular bootloader is GRUB. Of course, since this is Arch Linux, and we can configure literally every tiny detail, you can use a different bootloader as well. The different bootloaders have different use cases. Some might be used in servers for example.
In order to set up GRUB, we first need to install a couple of packages. Go ahead and install the following packages
pacman -S efibootmgr grub os-prober
Let's look at what are these packages we are installing before moving ahead
grub: This is the actual bootloader we will use to boot into Linux and Windowsefibootmgr: In the beginning, I mentioned the EFI partition will contain all our bootloaders.efibootmgrhelps us to manage the bootloaders present in the EFI partition. So we can do stuff like changing the boot order.os-prober: Theos-proberis needed only if you have another operating system such as Windows installed. The proper will detect the Windows bootloader, and add it to the GRUB menu. So you don't have to go into the bios and change the boot order every time.
If you remember, when we were mounting our filesystems, we did not mount the EFI partition. We will be mounting it now. First, we need to make a new directory called efi. We will be creating it in the boot directory, as this is where all information related to booting a Linux system goes. Go ahead and run the below command to create it.
mkdir /boot/efi
Now it's time to mount the EFI partition. If you don't remember what was the name of your EFI partition, go ahead and do a fdisk -l to list all your drives and their partitions. Now that you know what's the name of your EFI partition, go ahead and mount it in the efi directory which we just created. I will be mounting /dev/nvme0n1p1 as that is where my EFI partition exists.
mount /dev/nvme0n1p1 /boot/efi
Now that we have our EFI partition mounted in the correct place, it's time to install and configure grub (for real this time).
GRUB has some really handy commands that take care of most of the installation process for us. There are two commands which we will be using. grub-install and grub-mkconfig.
First, let's run grub-install. We need to provide two flags here. One is the --target flag, which will determine what is the target system. In most cases, your target system will be x86_64-efi. The only time you will have an ARM architecture is if you are using an apple MacBook, in which case you shouldn't really be trying to install arch. Anyway, the other flag is --bootloader-id which is the name that will appear in the BIOS boot menu. Let's go ahead and run the below command with all the flags mentioned
grub-install --target=x86_64-efi --bootloader-id=arch-grub
I've given the bootloader-id as arch-grub but you can give it any fancy name you want.
Next is to configure GRUB. Trust me, you do not want to do this manually. The GRUB docs are a nightmare to navigate through so it's better to do it using the grub-mkconfig command. But before we do this, we need to edit our grub settings so that it can use os-prober to detect the windows or any other bootloader.
Edit the file located in /etc/default/grub and uncomment the following line. It will usually be at the bottom of the file or you can use the search utility if you are using vim.
#GRUB_DISABLE_OS_PROBER=false
Now that you've uncommented this line, grub will use the os-prober to detect any other operating systems that exist on your system. Let's go ahead and run grub-mkconfig. We want to save the output to a file called grub.cfg which should be in /boot/grub/. The -o flag means we want to save it in the specified file. Let's go ahead and run it.
grub-mkconfig -o /boot/grub/grub.cfg
grub-mkconfig will detect any other operating systems, and it will also take into account the microcode which we installed in the previous step. With this, we are officially done with installing Arch Linux.
Now you can exit out of arch-chroot, unmount the partition, and reboot your PC. I will do this after setting up a desktop environment. The next steps will be to get a desktop environment up and running and configure it to our liking.
Setting up a desktop environment
Unless you are planning to use your Arch installation as a server, you want a desktop environment. This is where the painful part starts. Not because it is difficult, but because there are way too many choices to select from.
Before we go ahead and get a desktop environment, also called a DE up and running, I highly recommend you go and listen to this talk about Xorg and Wayland to understand how DEs actually work. This will help you customize your DE to your liking.
I won't cover how the DEs actually work in the backend. For that please check out the talk I linked above.
Installing Xorg
The whole point of having a DE is being able to run GUI applications. In order to run those, we will need a Windows System Implementation. A commonly used one is Xorg although it is slowly being replaced with Wayland. Regardless, many desktop applications still use xorg to render, so it's better to have it installed.
Run the following command to install the xorg-server package
pacman -S xorg-server
Once the installation is complete, we can move ahead to the next step and get graphics drivers so that the GPU can properly render the GUI.
Install graphics drivers
Graphics drivers are relatively easy to install. Unless you are using Nvidia. Nvidia changed the architecture a lot when they released the 1000 series cards. This makes it difficult to make open-source drivers for it. Hence, it's better to use the proprietary Nvidia drivers. Learn more about Nvidia-related drivers on this page.
You can still use the nvidia and nvidia-utils package to get some functionality. But if you face any bugs and you suspect them to be GPU-related, check out the page I linked above.
Now to install the drivers, you can run the following command based on which GPU you are using.
#For Nvidia dedicated GPU
pacman -S nvidia nvidia-utils

#For AMD dedicated or integrated GPU
pacman -S xf86-video-amdgpu

#For Intel integrated graphics
pacman -S xf86-video-intel
And that's it. We're done with the graphics drivers. If you are facing issues, check out the Arch Wiki for your specific graphics.
Installing a desktop environment
Now you have an Xserver, and your graphics drivers are all installed and ready to process some graphical data. All that's left, is installing a DE such as Gnome, Plasma, XFCE, or anything else. Check out the huge number of desktop environments you can pick from.
I am going to be installing Plasma, because it's the most stable I've found so far, and it uses Wayland. I did try out Gnome, but I'm getting way too many graphical bugs in it. And I'm sure that it's not my drivers since everything works pretty well in Plasma.
Alright, so now that we have decided on installing KDE plasma, let's go ahead and start installing it. If you have a second device with you, open the Plasma page in the Arch Wiki, and keep referring to it to understand what you're doing.
We are going to install the plasma group which will install everything we need to run the Plasma desktop. However, there are some things which will not be included in it. We will talk about those after installing the plasma package. I also want Plasma to use Wayland, so I will install the plasma-wayland-session package
pacman -S plasma plasma-wayland-session
After entering this command, you will get a couple of options. Notice that it is installing packages that you haven't told it to install. But in reality, you did tell it to install these packages. Notice that I called plasma a group, and not a package. A group in just what it sounds like. A collection of multiple packages. If you want an even more minimal version, then replace the plasma group with the plasma-desktop package.
The next step is to enable a desktop manager. If you installed the plasma group, then a desktop manager called SDDM is installed along with it.
Even though it's called a desktop manager, it doesn't actually manage your desktop. Calling it a Login manager is more accurate as it handles your login related stuff.
Let's go ahead and enable SDDM then we will unmount and restart our system. On the next boot, we will get a proper plasma desktop environment. Type in the below command to enable sddm.
systemctl enable sddm.service
There is another group called as kde-packages which you can install, but that installs a lot of useless packages as well, at least for my needs. So instead, you can browse the package, and install only what you need from there. I highly recommend installing dolphin, dolphin-plugins, and a terminal emulator. I will be using alacritty.
pacman -S dolphin dolphin-plugins alacritty
Reboot your System
Now after doing everything, we can finally go ahead and reboot our computer. Currently, we are in our fresh installation because we used arch-chroot. In order to exit this environment and return to your live boot media, simply type exit and hit Return.
Before rebooting, let's unmount the drive to make sure that there are no active processes running. If we reboot while there are active processes, we risk corrupting something which means doing the entire installation all over again. Go ahead and unmount your Linux partition by typing the following command
umount -R /mnt
The -R is just a recursive flag. It means unmount everything mounted inside the /mnt directory.
Now reboot by simply typing
reboot
You will see the GRUB menu. It should contain your Arch Linux, and Windows boot options. Go ahead and select Arch.
If you did everything correctly, you will be greeted by a GUI login page. Enter your username and password that you created earlier, and voila, You are now in KDE.
Customization hell
Welcome to your Arch Linux installation. Right out of the bat, it might look pretty plain. And now is the time to customize your experience. For the sake of length, I won't go into how you can customize each component, but know that you CAN absolutely configure each and every single component.
I will talk about what I have customized in my Arch installation, things that I tried and terribly failed, places where I went wrong and you shouldn't, and some extra stuff as well.
Changing the terminal
The very first thing I set out to customize, was my terminal emulator. The terminal is where I'm doing 90% of all my work, so it makes sense to beautify it. I looked around at multiple terminals such as kitty, xterm, gnome-terminal, konsole and many more, but in the end, I liked Alacrity thanks to the customization it provides. And also it seemed to look the best with a tiling window manager, not that I succeeded in getting one.
sudo pacman -S alacritty
I went ahead an installed alacritty using the above command. Now that we are outside the live boot environment, which means we are going to have to start using sudo since we are no longer the root user.
The next step was to create the configuration file for it. The GitHub page of alacritty has a sample configuration file called alacritty.yml. Copy this file into the ~/.config/alacritty directory. If it does not exist, create it. From here on out, configuring it is pretty simple. You just need to uncomment some lines and change some values.
I will be pushing all my config files to a GitHub repository which I will link at the end of the blog.
Switching and customizing the shell
At the start of this process, I told myself that I was going to stick with bash. I tried all kinds of ways to customize the bash shell, to have text highlighting, autocompletion, history, and other features. However, I wasn't able to get all of it, and it was still not up to the mark.
Then I found the fish shell. And I loved it. It gave me autocompletion, text highlighting, and history right out of the box. I didn't need to configure the shell behavior in any way.
sudo pacman -S fish starship
Notice I'm installing the starship package. This will simply be used to get a prettier prompt. Installing it was pretty simple. I just need a nerd font, and I need to copy and paste a line into my fish shell configuration located in ~/.config/fish/config.fish. After that, I simply used one of the theme presets. I might eventually do a manual customization, but for now, I like this theme.
The next step was to set fish as my default shell. This was rather easy. The first step was to find where the fish was located. According to the documentation, it is located in /usr/local/bin/fish, but not for me. I found it in /bin/fish. Anyway, now that I know where it exists, I have to add this path to the /etc/shells file. Next, simply open a terminal instance, and run
chsh -s /bin/fish
And then restart your PC. And we're done. We have installed, customized, and set fish as the default shell. It does have some shortcomings, such as bash scripts don't work properly with it, but that has a pretty easy workaround. Just switch to the bash shell by typing bash for running any scripts.
Getting my everyday applications
Next, it's time to get all the applications I use on a daily basis. So far we've only installed system essential files. I don't think I need to explain much here, so I'm just gonna type out the pacman command which I used. Some of the packages need further configuration which I'll talk about in their specific sections.
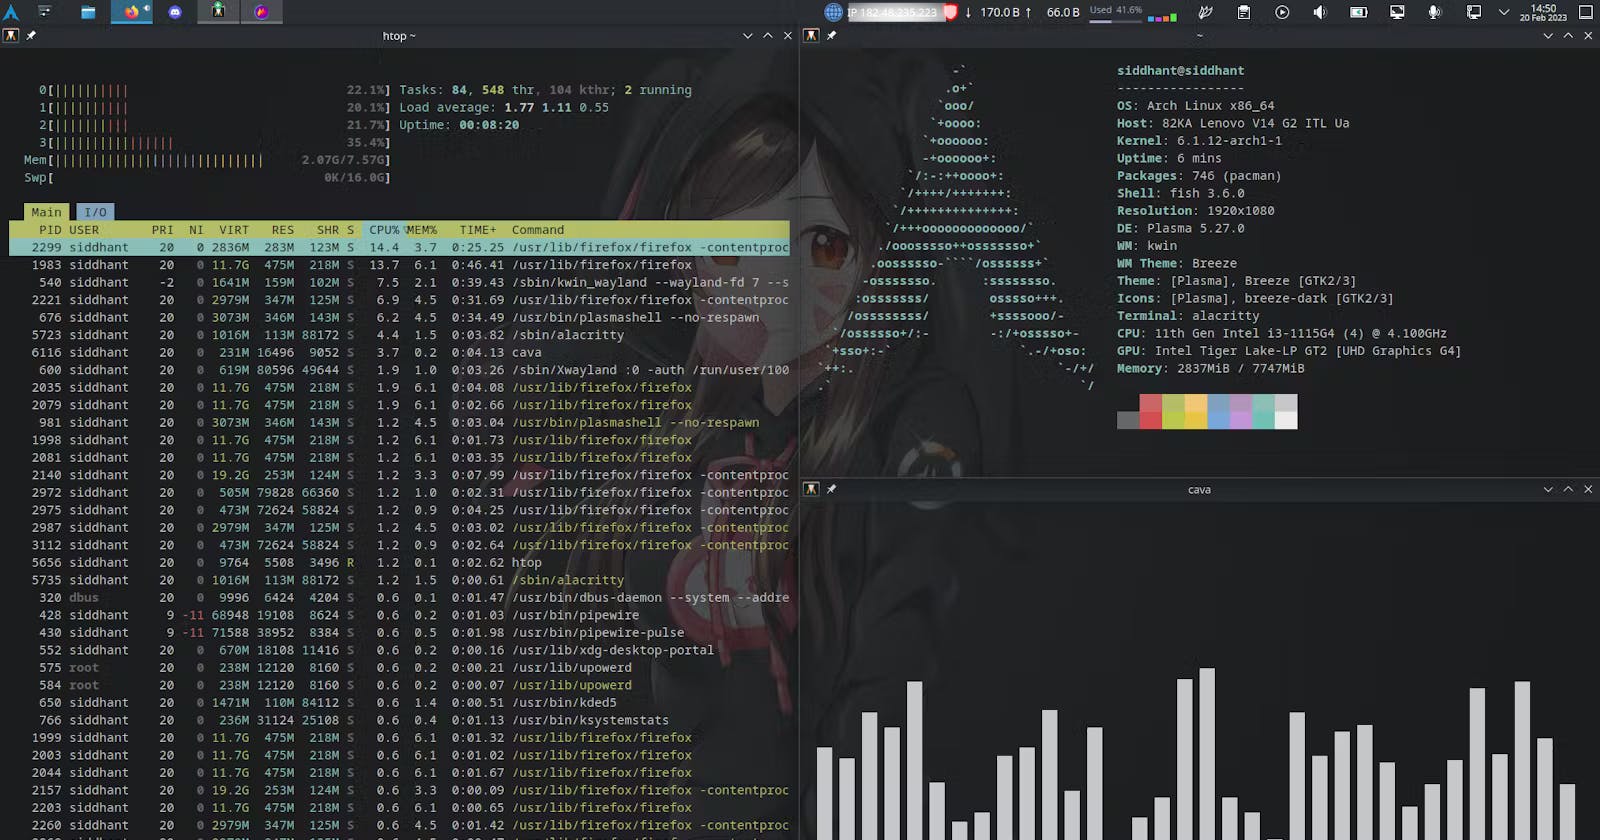
sudo pacman -Sy discord telegram-desktop firefox yay obs-studio flameshot emoji grub-customizer htop cava gwenview
You probably recognize some of these packages. The rest you can google. One thing worth mentioning is the yay package. yay is another package manager but it's used to install AUR packages. It's super handy if you don't want to clone and build the packages manually.
Getting Bluetooth
I use a lot of Bluetooth devices. My keyboard is Bluetooth, and when I'm traveling, I use Bluetooth headphones. So Bluetooth is one of those things I cannot ignore. Luckily, getting it working isn't very difficult.
Since we are using KDE, we will already have blue-devil installed, assuming you installed the plasma group and not the minimal desktop package. However, I wasn't able to get blue-devil started on the system boot. Hence, I will be using bluez. Go ahead and install the two packages mentioned below:
sudo pacman -S bluez bluez-util
Now in order to get it to start when my system boots, I want to enable the Bluetooth service. To do this I can run
systemctl enable Bluetooth.service
Now, this should enable Bluetooth when the system boots. But alas, it didn't work. Why? After a bit of digging, I found out that this was a KDE-specific thing. In order to get it to start on boot, I needed to enable it from the GUI system settings. Then it started working.
Now I also want to be able to connect an audio device using Bluetooth. Luckily this is pretty easy to do. I just need to install the pipewire package. We can even use the pulseaudio package, but pipewire seems much better and gives a lot more features out of the box. We will also need pipewire for screen-sharing stuff. That's why I'm going to use pipewire as I don't want necessary bloat in my system.
sudo pacman -S pipewire
Customizing the KDE desktop environment
Customizing KDE is actually very easy. You can use the system settings to configure your KDE appearance. One challenge I had with this was the taskbar. I couldn't figure out how to turn it into a dock, and I still don't know how to do it.
I gave up on the dock idea, and instead, I turned it into a status bar on the top of my screen. In order to customize it, simply right-click on it, and click on Enter Edit mode. I added a ton of widgets and changed some of my icons.
The rest of the settings are pretty intuitive to understand hence, I won't be talking about them. You can find all of them in the system settings.
Changing the desktop manager
For a long time, I had a problem where shutting down or restarting my PC would take a long time. Almost 2 minutes. This was frankly unacceptable and it took a lot of searching to find out why this was happening.
I figured out that it is something related to sddm the kernel. Now obviously I cannot get rid of the kernel. That's the same as killing my OS before recovery. Luckily, sddm is something that I can change. I found a page of supported display managers for Arch. I tried using greetd, as I can configure it to use Wayland support but I haven't been successful so far.
So, instead of those, I decided to use ly. A console-based Display manager. I have to bring up this point again why are they called Display Managers? The name is really misleading. Anyway, moving on, let's go ahead and install ly. You can install any display manager listed in the arch wiki. The process will pretty much be the same, but it's better to refer to the specific display manager's wiki page.
The first thing to do, before uninstalling sddm, is to remove the symbolic link to it. Yes, I know we haven't created that. Not manually at least. When we enabled the sddm.service it automatically generated a symbolic link. Thankfully, if sddm is still installed, it's easy to remove the symlink. Simply run
systemctl disable sddm
And now you can uninstall `sddm` using
sudo pacman -R sddm
At this point, if you restart your PC, don't panic, you haven't done anything that cannot be recovered. You will simply be taken to the TTY, instead of a display manager. From here you can easily load your DE (if you know the command), or install a new display manager and enable it.
ly does not exist in a pacman repository. Instead, it is an AUR package. We can either clone it, and build it ourselves, or we can use the easier approach and use yay to install it.
Check this article on how to install and use yay. After that, we can install ly using a simple command
yay -S ly
One final step. Enable the ly service.
systemctl enable ly.service
And with that, we have successfully changed our display manager. And also fixed the issue of a 2-minute shutdown time.
You can customize the looks of ly, but I personally did not like any of the customization options. You can change the customizations to your liking. The file is located in /etc/ly/config.ini.
Changing the screenshot utility
Next, let's change what app we use for taking screenshots. We have already installed it previously. We will be using flameshot as the screenshot utility.
After installing it, you only need to add the printscreen key bind to it. You can easily do this from the KDE system settings GUI app.
Changing fonts
Fonts are also quite easy to change. I'll list the steps so you can use these steps to install any fonts.
Download your favorite fonts. Make sure they end in
.tffUnzip them into a directory which is the font name. For example, if I'm installing noto-fonts, I will unzip it inside a directory called
noto-fonts/Move all the directories to
/usr/share/fontUse the KDE settings GUI to change your system-wide fonts.
Getting emojis to render correctly
If you press Ctrl/CMD + ., you will get a emote menu to appear, assuming you installed the plasma group. Instead of having any emojis, you might just see a lot of squares, circles, and diamonds. This is because we don't have the emoji font pack and it's a very easy fix. Simply run the below command to download the emoji pack:
sudo pacman -S noto-fonts-emoji
Getting screen share to work
Screen sharing can be a problem at times. It only partially works, unless you fix it. What I mean is you can share individual applications, but you cannot share entire screens. You will only share a black screen.
Again, this is an easy fix, but one that needed a lot of time to figure out how to fix. The fix is just installing a few packages. Run the below commands to install the packages to be able to use full-screen sharing.
sudo pacman -S pipewire wireplumber xdg-desktop-portal-kde
These three packages should let you use full-screen sharing in OBS and firefox. I haven't tested it with other browsers but it works beautifully with firefox. This still does not work on discord, however. In order to use full screen-sharing on discord, I use a secondary discord client called webcord.
The nightmare of the tiling window manager
Here starts the section of things I failed to do. The first and biggest failure was tiling window managers. They are great obviously because then you don't need to manually drag and position your windows. However, KDE uses the Kwin window manager and it cannot be changed.
There are a couple of workarounds for it, but none of them worked for me so I ultimately gave up.
For a short period of time, I did get the tiling window manager to work. I used the KDE bismuth script for it. However, with the release of KDE Plasma 5.27, bismuth broke and a combination of titling and stack occurred.
This is when I decided to try and switch to sway. Sway allowed me to use tiling, however, I was sacrificing other essential aspects such as the ability to use discord. I did not troubleshoot it for a very long time though, as doing that would take days, and I wouldn't get any real work done. I might not have written this blog if I tried to get Sway to work perfectly.
A failed attempt at customizing GRUB
In the WeMakeDevs discord server, I saw that someone had customized their GRUB. And that got me thinking about how was that possible. I looked into it and turns out there is a package called as grub-customizer that I can use to customize the appearance of GRUB. I tried it and it did not work.
However, me being stubborn, tried something else. I found a couple of grub customization scripts on GitHub. But those scripts did nothing. My grub was still the default layout. Again I mentioned this point in the previous section, trying to customize stuff was taking way too much time, so I decided to give up for now.
Hopefully, in there future, there are ways to integrate tiling window managers into KDE easily, and I figure out the Grub stuff.
Final Thoughts on Arch
That was all for this super-long article on Arch Linux. Is that everything there is to Arch? No! There are some things I missed out in this blog such as how to use yay or pacman properly. You should refer to the arch wiki for those. But hopefully, this has taught you more about how Linux works, and what those automated installers do behind the scenes.
I will be pushing all of my arch configuration files into this GitHub Repository, so that I have a backup in case I mess up something and need to install arch once again. You can take a look at them and use them for yourself if you'd like.